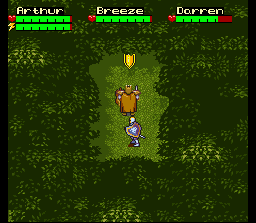
1. Start the game and you're in Camelot Castle. Merlin will appear and tell you to get the sword Excalibur from the Lady in the Lake. But you know how it is in adventure games, nothing's ever that simple. Go left to the Round Table room and select two knights to take with you (I highly recommend taking Breeze, for the other one, I don't care who you select.) Then leave Camelot through the south exit. NOTE: Whenever you return to Camelot, your party will break up. If you try to leave Camelot without putting two other knights in your party, Merlin will stop you. If at any time you need help, you can go through the door on the right (opposite the round table room) and talk to Merlin. He will usually repeat the last thing he told you.  2. When you leave Camelot, go all the way north and take the left path. From this area, there are three paths going west. The middle one leads to the Lady of the Lake. Take that path and defeat the knights that appear. When they're gone, the Lady appears and tells you to get the Pendragon Shield from Shield Heights to prove your worth. Before you leave this screen, walk all the way north and grab the Eye of Newt from near the trees.  3. Leave the lake area and go just slightly west. Under a tree, you'll see some Nightshade (blue flowers). Grab them.  4. Now go northwest and take the uppermost path going west. This will take you to an area with two paths going west. You can find Breeze's Shield in a clearing in the woods. Find the hidden path through the trees (from the southeast) to get it. You WILL need it.  5. You will also find another blue flower sitting next to a red poisonous enemy flower. Evade the flower's poison pollen and grab the blue flower. This is the Monkshood.  6. This step is optional, but I highly recommend doing this. Take the lower path going west and you'll be at a cave entrance. Go in the cave. At the far left side there is a Healing Herb. Stand on it, then enter your inventory and exit. The herb will regenerate and you'll collect it again. Keep doing this until you have 99. Then leave the cave and go all the way back to the first area of the forest (where you got the Nightshade).   7. Walk along the northern path of this area. Press up into the trees along the way and eventually you should uncover a hidden grove (Arthur is standing below the correct spot in my first screenshot). Defeat all the knights here and grab the Warlord Helmet that's lying on the ground.  8. Return to the path and go all the way northeast until you see a wall of flames. With Arthur at full health, try stepping into them. You'll get a message saying that you need Merlin's help.  9. Just south of the wall of flames is a Hairball lying under a tree. Grab it. 10. Return to Camelot. NOTE: You can easily return to Camelot at any time by pressing Start, then choosing the Map option. Move the Shield over Camelot Castle so that it lights up and press B. This instantly warps you back. Later in the game, you can use the Shield to warp to places you've already been. As long as it lights up on the map screen, you can warp there. 11. Go to Merlin's room and talk to him. He will tell you about the items he needs to make the Fire Protection Spell. Talk to him again and he'll notice that you already have the necessary items and he'll make the spell. (Note that Merlin will only offer to make the spell if you tried walking through the wall of flames. Otherwise, even if you have all the items, he won't do it.)  12. Go back to the wall of flames and use the Fire Protection Spell. Walk through it and take the one and only path all the way to the top of Shield Heights. Keep Breeze alive. When you reach the top, you will automatically gain control of Breeze to fight the dragon (if you got his shield earlier.) Refer to the Boss Guide for strategy. Grab the Pendragon Shield from the statue when the fight is over.  13. Return to the Lady of the Lake. Now she'll make you walk across a blind path through the water to get the sword Excalibur. It's easy to do by trial and error because even if you take a wrong step, you don't lose any health or die. You just get sent to shore. But, anyway, the correct path is: Up, Up, Left, Left, Left, Up, Up, Up, Up, Right, Right, Right, Up, Up, Left, Left, Left, Left, Up, Left, Left, Left, Down, Down, Left, Down, Down, Down.   14. Go back one screen from the lake and walk along that northern path again. Find a small section of the road that branches downward and disappears into the trees (Arthur is standing above the correct spot in my first screenshot). Follow that down and you'll find the hidden Blacksmith's house. Talk to him and he tells you that a Warlord patrol to the north needs to be dispatched. If you're following this guide, you already did that. Talk to him again and he'll notice the Warlord Helmet in your inventory as proof that they are gone. He'll give you the Book of Eld. 15. Return to the cave where you got the healing herbs and talk to the man in there. Give him the Book of Eld and he'll let you use the passageway behind him. Enter the passageway (just past the herbs.)  16. You're now in Tintagel Castle. Refer to the Dungeon Maps if you're having trouble getting through it. If you have Breeze with you when you reach the room before the boss, you will fight the boss as him. Otherwise, you will use Arthur and have to return with Breeze to collect the Key of Truth. Refer to the Boss Guide for strategy. Congratulations! End of Quest #1.  |
BACK TO KNIGHTS OF JUSTICE SHRINE

![]()
