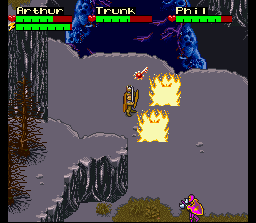
 1. Now Merlin sends you on a quest to find four elemental keys that will unlock Castle Vilor. Note that this is the first quest in which you'll receive more than one Key of Truth. Be forewarned that it is one of the longest quests you'll face yet and you must do the entire thing before you can get your next password, meaning that if you have to quit during this quest for any reason, no matter how much you had done, you'll have to do the whole thing over again from the beginning when you restart. Begin by warping to the northernmost part of Blinder's Way again (as you did in the last quest, just one square east of the uppermost part of the swamp), and this time take the north exit. This will put you in the northern forest area.  2. From this screen go north, through a patch of Mushroom enemies, and keep going north to the next screen. From there, start going west, and go north when the path forks. As soon as it starts going west again, take that path and keep going all the way until you reach a dead end at the trees, and then start going north again. Follow the path all the way up and around until it leaves the top part of the screen. Follow that path north and keep going north as far as you can until you come to a spot that looks just like my screenshot above. See what looks like a trail in those trees above Arthur? That indicates a secret pathway. Go in there.  3. You'll see a big shadow on the ground. Weird, isn't it? You'll find out what it is eventually, but it is absolutely necessary to come here first or else when you talk to the character who will help you figure this mystery out, he won't do anything.  4. Leave that area and start following the trail going east. Keep going east and leave the screen. Now go north and keep going north until you leave the screen again. Go north some more and you'll come to a gate that shouldn't allow you to pass through it just yet. To the right of that gate is a trail that goes up off the screen. Take that path and you'll end up on a charred-out cliff with a bunch of Fire Elemental enemies. The Fire Elemental Key is lying on the ground here. Kill the enemies and grab the key.   5. Leave that screen and then go east a little ways and start following the trail south. Leave the screen and keep going south until you come to the spot show in my first screenshot. Walk into the little cul-de-sac there and the Gnome King will pop out of the ground. He'll ask you to look for his missing son, so make sure to answer "YES" to his request to find him. (On a side note, when I first played this game years ago, this was the last key I was missing, and it took me FOREVER to figure this out! It didn't help any that I had no idea what I was looking for and I happened upon the Gnome completely by accident.)  6. Turn around and go all the way north again and leave the screen. Go north just a little bit and you'll see a group of red and green knights. They are surrounding the Gnome King's son, who has been tied up. Defeat all the knights and talk to the Gnome to free him.  7. Go back to where you found the Gnome King and talk to him again. He will give you the Earth Elemental Key. He will also take you to a place where you're supposed to take a test. The Gnome's son will tell you that the only one who can pass the test must be of a "confused note". Just remember that clue for now and walk forward until Arthur falls into a hole. Then take the staircase back up to the forest floor.  8. Start going south and keep following that trail south as far as it goes until you reach a wide open field. In this field are a bunch of Rock Golems. Some of them are moving around shooting rocks at you. Others are standing in a group. The ones standing in a group are on top of an item called Pitch Blend. You need to get this, so defeat all the Rock Golems and grab it, but be warned that these enemies are quite tough!   9. Go to your map screen and warp into the Swamp of Zagar. Follow the path to Blaise's house as you did before in Quest #4. (If you warp to the upper-rightmost corner of the swamp, you'll be right in front of the entrance to his house.) Talk to him. If you saw the shadow in the field earlier as I had instructed you to do, he will turn your party into birds one more time so that you can fly to the island in the sky that's causing the shadow. The Air Elemental Key is up there and you will automatically get it. NOTE: I do not know why Blaise tells you to find the Staff of Life in the bakery at Crownhorn Village. You never actually do this. I am guessing it was a step involved with a quest that did not make it into the finished version of the game. Update: It turns out that "Staff of Life" is a synonym for "bread". This is why Blaise tells you to go to a bakery to get it. However, it's still not something you can ever actually do. But since a bakery does exist in Crownhorn Village, I'm standing by my theory that it was a planned event that got excised.  10. Use the map to warp to the center of the swamp area (near the big tree.) From the big tree, go north past the Eye of Newt as far as you can, and then go west. Take the south bridge, and then go west until you see a bridge going north. Go north, ignore the path going west, and keep following the trail north until you reach the end of the screen. Leave the screen going north and you'll end up at the house of Druas the Alchemist. He will tell you that he needs Pitch Blend so that he can turn lead into gold. If you got it from the Rock Golems earlier, just keep talking to him until he hands over the Water Elemental Key. You now have all four keys.  11. Leave Druas's house and before you do anything else, warp back to Camelot Castle. Go to the Round Table and put Tone in your party. Take anyone else you want besides Brick. Check your inventory to make sure you still have the Scroll from the Wise Woman in Welton Village. If you don't, you'll have to warp back to Welton and talk to her to get it. If you have Tone and the Scroll, go back to where you found the Gnome King. If you're having trouble finding him, follow these directions: Warp back to the same section of Blinder's Way I instructed you to go to in the very first step of this quest. Leave through the north gate again. This time, take the righthand path going north, past some grass-like enemies, and leave through the top of the screen. Go north until you see a path going east, and take it so that you leave the screen again. Go straight east until you reach the trees, then go south a little ways until the trail starts going east again. Follow it and then go up a ways back through the same field where you got the Pitch Blend from the Rock Golems. Keep going north along the trail and you'll eventually find the cul-de-sac where the Gnome King was. Walk into that spot and you'll warp to the place with the pits where the Gnome's son gives you the clue about the "confused note". This is why you want to have Tone in your party. The word "tone" is an anagram for "note" and they have a similar meaning. The key you will get here is Tone's key.  12. This maze is reminiscent of the Lady of the Lake's test, except that if you make a mistake here, not only will you have to start all over again, but you'll take some damage and the correct path will not become revealed as you walk through it. I'll give you exact instructions on how to do this. First, take a step forward so that your other knights don't block Arthur's movement. Walk down until Arthur is standing on the white flower, as shown in the screenshot.  Walk to the right until Arthur is lined up with those two grass clumps above his head.  Walk up until Arthur is standing between those two grass clumps, lined up with the white flowers to his right.  Walk right so that his toes are touching that first grass clump, but do not touch the white flowers.  Walk straight up to the wall of bushes.  Walk right and stop in the spot just before the shadow of that tree. Don't touch the shadow!  Walk down until you're just to the left of that solitary clump of grass.  Go straight to the right, up against the large bush, and from there, go south to the pedestal. You'll hear a noise indicating the "spell" on the area has been broken, and now you can walk about freely.   13. Go up to the pedestal and use the Scroll from your inventory. (Actually, I'm not sure if you have to do that or if Arthur reads it automatically. If he doesn't do anything at the pedestal on his own, use the Scroll.) When the dialogue boxes clear, step out of the way so that Tone has room to get over to the key and claim it. You'll be warped back to Camelot Castle.  14. Once again, warp to that top area of Blinder's Way and leave through the north gate. Take the righthand path going north, past the grass enemies, and leave the screen. Go north and take the first path going east and leave the screen. Go straight east until you run into the wall of trees, and then start going north. Keep going north and don't stop until you see the cellar door that's depicted in my screenshot. Go into your inventory and use all four Elemental Keys. Now you can enter the door to Castle Vilor.  15. Getting through Castle Vilor is simple, but the solution may not be obvious at first due to the warps. Take the upper door, and then go north all the way through another door. Then go all the way east through another door. Take the warp and that'll put you in front of the boss room. Refer to the Dungeon Maps if you still have any trouble, and the Boss Strategy for help with Lucan (if you need it). When you are done, bring Brick back here to claim his key. Congratulations! End of Quest #5. NOTE: If you did not get Tone's key from the Gnome Woods, Merlin will appear in the room before the boss and forbid you from entering. As such, this is one of the few castles that you can leave before beating the boss. You'll have to find your way out and locate Tone's key first, and then come back.  |
GO TO QUEST #6
BACK TO KNIGHTS OF JUSTICE SHRINE

![]()
